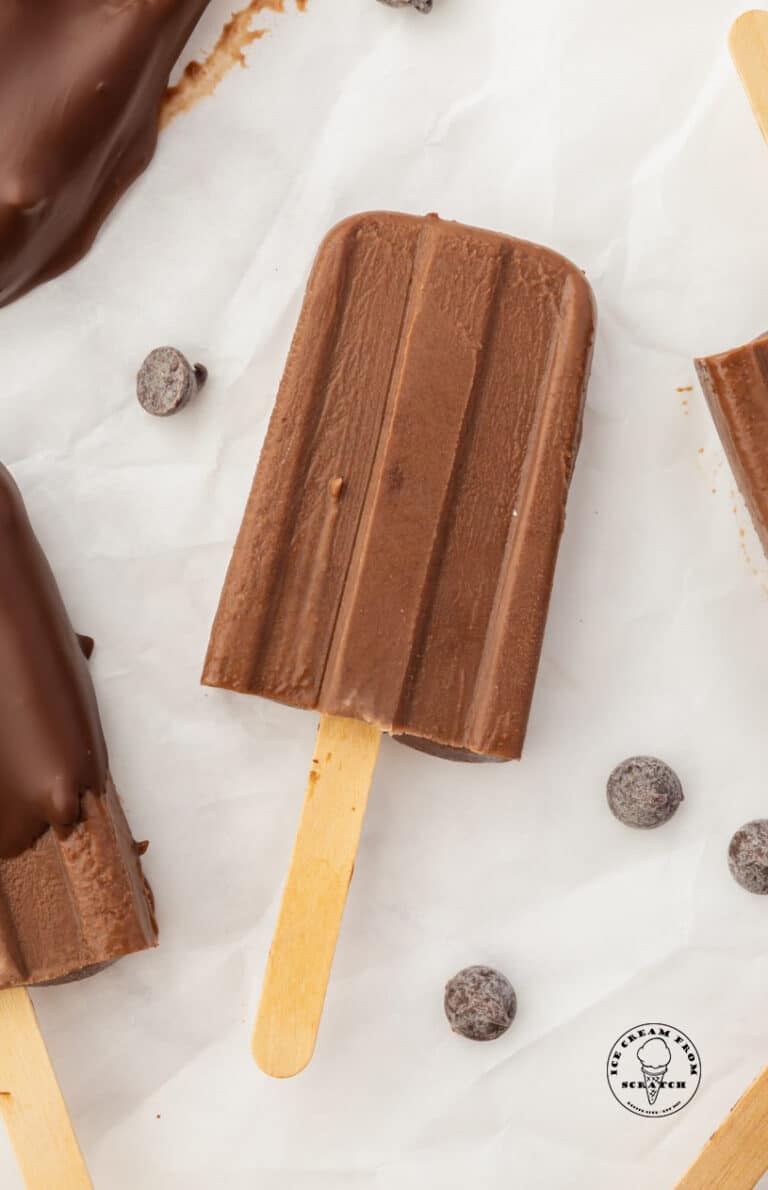
Chocolate Ice Cream Bars
Enjoy rich, creamy chocolate ice cream bars dipped in chocolate with this easy recipe you can make at home!
Transport yourself back to easier times with a chocolate ice cream bar on a stick, made with simple, all-natural ingredients. This recipe is naturally nut-free and gluten-free.
For a different twist on chocolate covered ice cream bars, try making Banana Popsicles too!

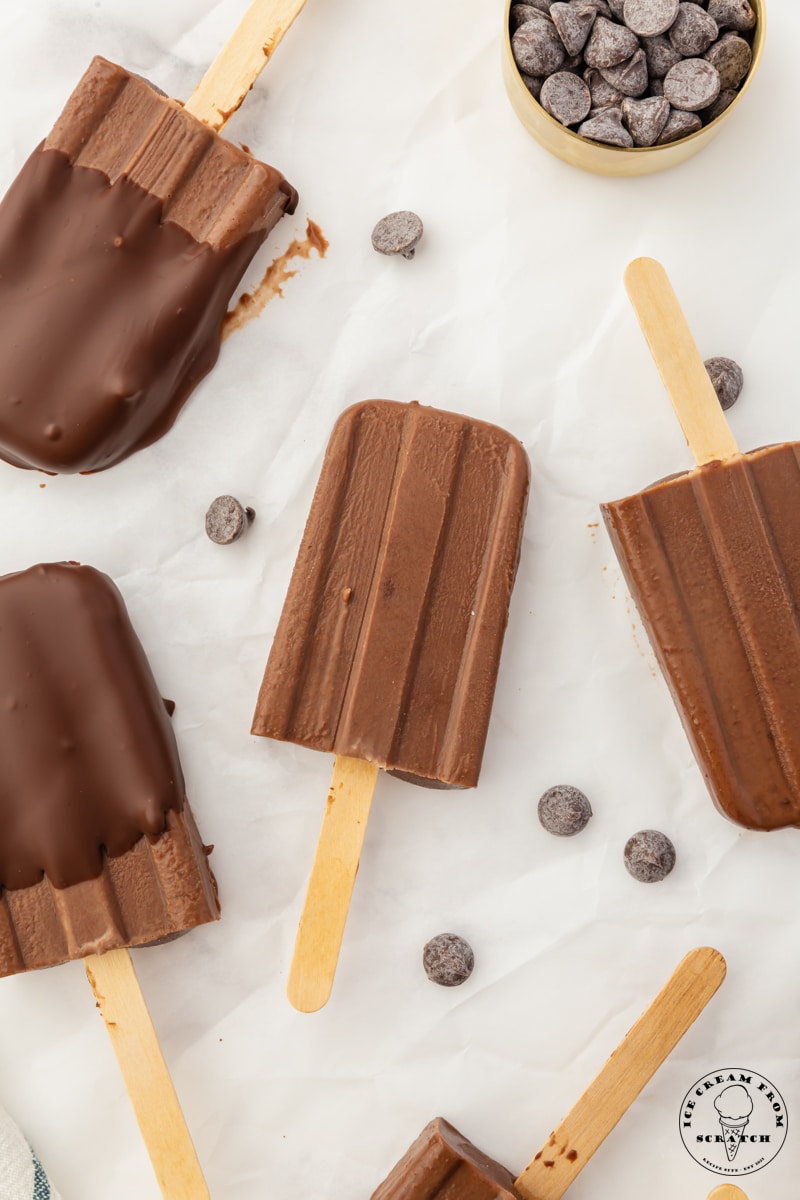
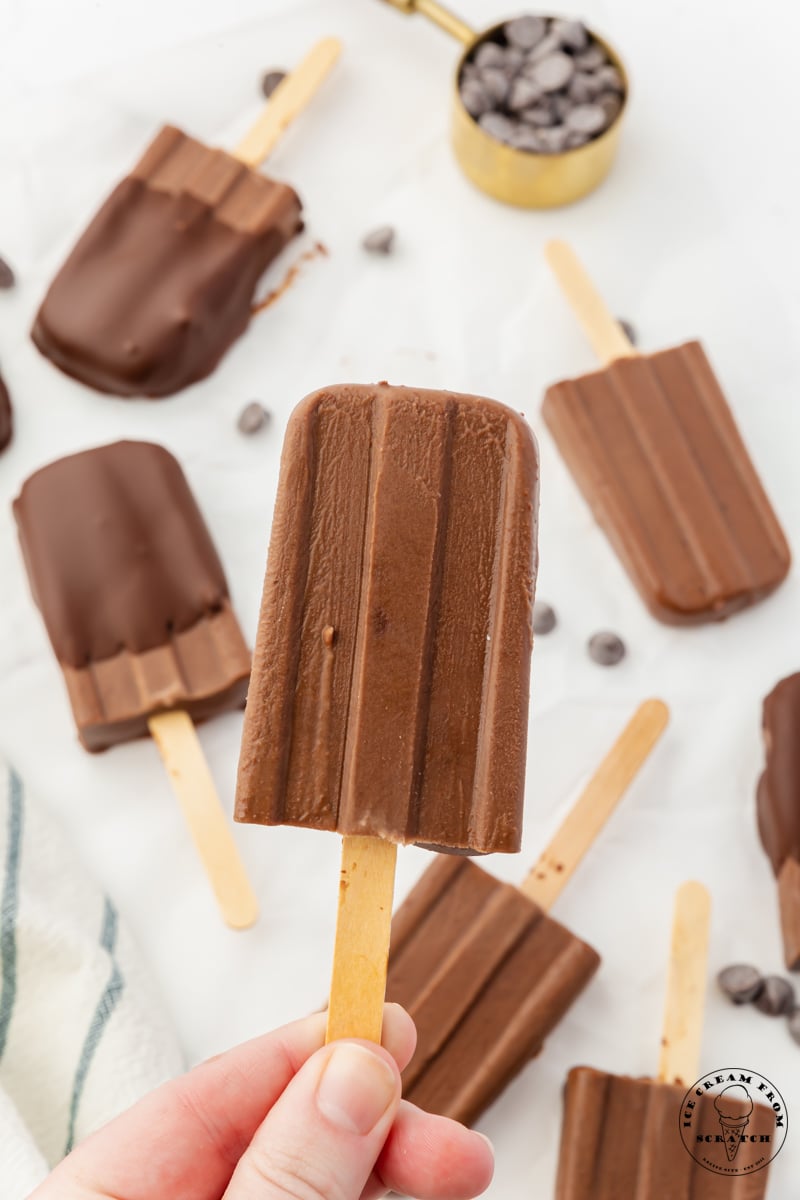
Imagine opening up the freezer to find a batch of these decadent chocolate covered ice cream bars in there, just ready to grab and enjoy! They are similar to fudgesicles, but dipped in chocolate.
With less than an hour of effort, you can fill the freezer with ice cream treats for yourself or the whole family!
Of course, kids love ice cream bars, but this recipe isn’t just for them. These homemade chocolate ice cream bars are extra rich and perfect for solving any chocolate craving you might have.
If you’re a chocolate lover, be sure to check out our recipes for no-churn chocolate ice cream, and homemade hot fudge sauce. Put them together to make a double chocolate hot fudge brownie sundae!
Why You’re Going to Love this Chocolate Ice Cream Bars Recipe
Rich, Creamy, Delicious. Cocoa Powder and melted chocolate mixed with rich cream and milk, the perfect amount of sugar, and a little bit of vanilla extract make the most decadent, smooth chocolate ice cream bars you’ve ever had.
Homemade is Better. These chocolate ice cream pops taste so much better than anything you’ll find at the grocery store, and because you know every ingredient that goes into them, you can feel good about making them for your family.
A Healthier Option. Compared to a bowl of chocolate ice cream, or a chocolate milkshake, these pre-portioned ice cream bars are a better choice. With the chocolate coating, each will be about 330 calories. Without it, only about 200!
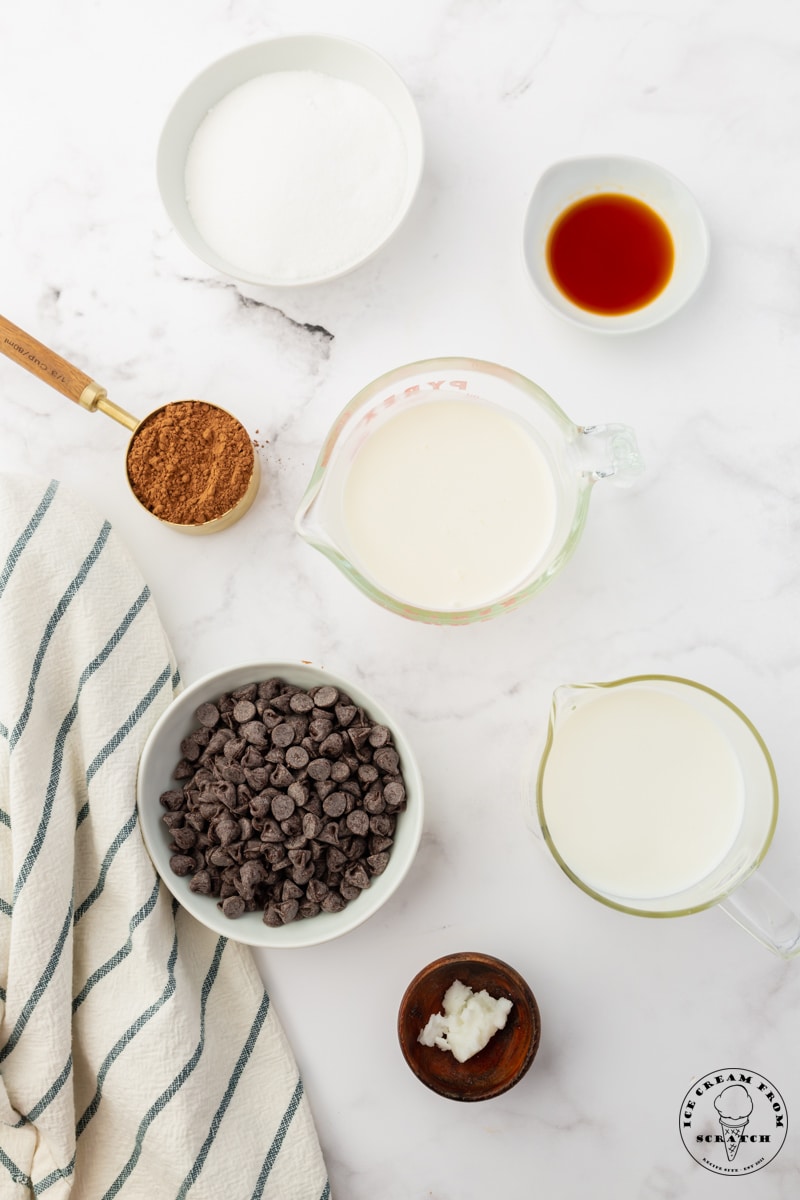
Ingredients in Homemade Chocolate Ice Cream Bars
Heavy Cream – The first of our dairy ingredients, heavy cream ensures that these fudgesicles are rich and decadent.
Whole Milk – If we used all heavy cream, the mixture would be too thick. So, use half cream, and half milk for best results.
Granulated Sugar – Granulated sugar is the perfect sweetener for most popsicle and ice cream recipes.
Cocoa Powder – Unsweetened cocoa powder is the first layer of chocolate in this recipe.
Semi-sweet Chocolate Chips – Using both cocoa powder and chocolate chips gives these fudgesicles the best chocolate flavor.
Vanilla extract – Vanilla extract makes chocolate taste better!
Chocolate Coating – Chocolate covered ice cream bars are dipped into a mixture of melted chocolate chips and coconut oil after they are frozen. Yum!
If you have any questions about making Chocolate Ice Cream Bars, please leave a comment below and I will get back to you!
How to Make Chocolate Covered Ice Cream Bars from Scratch
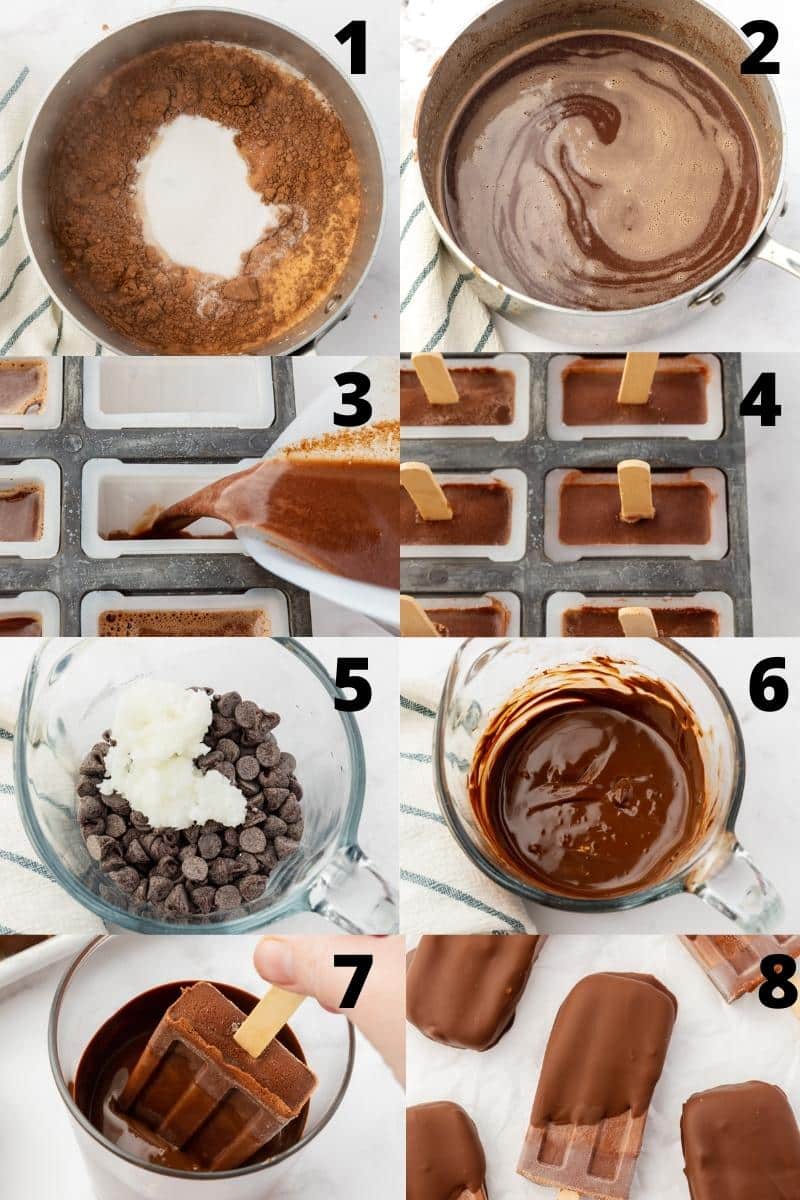
- Start by Cooking the Fudgesicle Mixture. Add the heavy cream, whole milk, sugar, cocoa powder, chocolate chips, and vanilla extract to a saucepan over medium heat. Whisk to combine.
- Cook over medium heat, stirring frequently, just until the chocolate chips have melted.
- Let the mixture cool for about 10 minutes, then pour it into popsicle molds.
- Freeze for at least 6 hours, or until firm. Release from the molds. Place the ice cream bars on a baking sheet lined with parchment paper and return to the freezer while you prepare the chocolate coating.
- Melt 1 ½ cups of semi-sweet chocolate chips and 1 tablespoon of coconut oil in a microwave-safe bowl or glass. Dip the ice cream bars, one at a time, into the melted chocolate, tapping to remove any excess.
- Freeze: Return the dipped chocolate bars to the baking sheet, and freeze for 10 minutes before enjoying, or wrapping them up to enjoy later.
These numbered steps match the numbered photos above and are for illustration purposes. For the complete list of ingredients and instructions, please see the recipe below.
How to Store Homemade Chocolate Ice Cream Bars
Store Chocolate Ice Cream Bars in the freezer, in their mold until ready to enjoy.
If you’re dipping them in chocolate, or If you decide to remove them from the mold without dipping them, you should wrap each popsicle individually with plastic wrap before storing them in a freezer-safe, airtight container.
How Long Will Chocolate Ice Cream Bars Last in the Freezer?
I find that homemade chocolate ice cream bars are best if enjoyed within 2-3 weeks, but often will stay fresh for much longer than that, up to 3 months
Store-bought chocolate pops can last much longer in the freezer, but that is because they are made with processed ingredients that give them a longer shelf life.
Tips for Making This Chocolate Covered Ice Cream Bars Recipe
Use quality ingredients – When making homemade chocolate ice cream bars, you’ll want to make sure you are using high-quality ingredients for the best outcome.
Don’t skimp on the sugar – Sugar not only adds sweetness to ice cream bars, it also helps with the texture. Popsicles without enough sugar in them will be hard and icy.
Avoid overcooking – You want to heat the milk and cream gently, and stop as soon as the chocolate has melted. Scorched milk doesn’t taste good, so stir frequently, and remove promptly from the heat.
Any type of chocolate can be used – I used semisweet chocolate chips because they’re always in my kitchen, but dark or milk chocolate will be tasty too. For the topping, try melted white chocolate instead!
You don’t have to dip these in chocolate – They are completely decadent without the coating. The extra chocolate dip just makes them especially delicious.
Keep the Pops Cold – Leave the chocolate ice cream bars in the freezer until just before you dip them in the melted chocolate. They can melt quickly.
How Long Do Chocolate Ice Cream Bars Take to Freeze?
You should let the pops freeze in the molds for at least 6 hours, but the exact time it takes will depend on the size of the molds you’re using.
Smaller molds could be ready in as few as 4 hours. I recommend letting them freeze overnight to be safe though.
How to Unmold Homemade Chocolate Ice Cream Bars Easily
There are a few different methods to easily unmold homemade popsicles, fudgesicles, or ice cream bars. The one that works for you will depend on your specific popsicle mold. None of them are complicated!
The trick to easily unmolding popsicles is to heat the very outer layer of the pops so that they release from the mold, without melting them in the process.
Method 1: Dipping in Hot Water. This method involves filling a large bowl or container with warm water. Then dip your tray of popsicles briefly into the water for 20-30 seconds until the popsicles are easy to remove.
Method 2: Running Water. Instead of filling a bowl with water, just turn the kitchen sink on and let it get warm. Hold the popsicles under the stream, moving them around, for about 30 seconds until you can get the popsicles out of the mold.
Method 3: Room Temperature. Take the popsicles out of the freezer and set them on the counter until they soften enough to be easily removed. This method can backfire if you forget about them, so be careful, or set a timer!
If you’re using a silicone popsicle mold, you may not need to do anything. If it’s flexible enough, the silicone can be peeled away from the popsicles easily!
How to Make Dairy Free Chocolate Ice Cream Bars
I haven’t tested a vegan version of this recipe just yet, but when I do, I will likely replace the milk and cream with coconut milk and coconut cream like I do in my coconut ice cream recipe.
These dairy-free milk substitutes will give you the creamiest results. If you try it, please leave a comment and let me know how it worked for you!
More Homemade Frozen Treats
We have so many homemade ice cream recipes for you to try! If you’re looking for something sweet and delicious, but a bit easier to make, try one of these:
- Choco Tacos
- Banana Popsicles dipped in chocolate
- Ice Cream Pie
- Fried Ice Cream
- Coke Float
What Can I Use Instead of Popsicle Molds?
Any type of small container can be used to make popsicles and ice cream bars! Try small plastic cups like bathroom cups or empty yogurt containers, or use an ice cube tray to make mini ice pops.
Cover the top of the container with foil, then put your sticks through the foil to keep them upright while the chocolate ice cream bars are freezing.
LET’S GET SOCIAL, you can follow us on Pinterest or leave a comment below if you have any questions.
Did you make this Homemade Chocolate Ice Cream Bars Recipe? Leave a Comment Below letting us know what you thought!

Chocolate Ice Cream Bars
Enjoy rich, creamy chocolate ice cream bars dipped in chocolate with this easy recipe you can make at home!
Ingredients
- 1 cup heavy cream
- 1 cup whole milk
- 2/3 cup granulated sugar
- 1/4 cup cocoa powder
- 1/2 cup semi-sweet chocolate chips
- 1 tsp vanilla extract
For topping:
- 1 ½ cups semi-sweet chocolate chips
- 1 tbsp coconut oil
Instructions
- Add the heavy cream, whole milk, granulated sugar, cocoa powder, semi-sweet chocolate chips, and vanilla extract to a saucepan over medium heat. Whisk to combine.
- Cook until the chocolate chips have melted, stirring frequently. Let the mixture cool for about 10 minutes.
- Pour the cooled mixture into the popsicle mold.
- Place the lid on top and place the popsicle sticks into each mold. Freeze for at least 6 hours, or until firm.
- Once frozen, combine the remaining 1 ½ cups of semi-sweet chocolate chips and the coconut oil in a microwave-safe bowl or measuring glass.
- Microwave in 30 second increments, until the chocolate is melted. Stir until smooth.
- Release the popsicles from the mold, one at a time, and then dip into the melted chocolate. Tap off any excess chocolate.
- Immediately place the popsicles on a baking sheet lined with parchment paper and freeze for at least 10 minutes. Serve immediately or place in freezer-safe bags to enjoy later.
Notes
Nutrition Information:
Yield: 10 Serving Size: 1Amount Per Serving: Calories: 337Total Fat: 21gSaturated Fat: 13gTrans Fat: 0gUnsaturated Fat: 7gCholesterol: 29mgSodium: 21mgCarbohydrates: 39gFiber: 2gSugar: 34gProtein: 3g

I wonder if these would work in a silicone mold like this one? https://www.amazon.com/Homemade-Popsicle-Silicone-Maker-BPA-Cavities/dp/B07CSPLV65/ref=sr_1_1_sspa?crid=13JZ5EAEVV4KH&dib=eyJ2IjoiMSJ9.nLSwZMqB_-iG09v83Fjwy4HZmucwC1roxn_lwgEyeBdMSrmvCd9lvxSeXg5wQQDc1Vf-5bE5vyRKUBFTZmP-nKaJxG_ruX3oOvoMPQAgHslJi_rmC6chuR2aGJkTTk8DCeS3ySKCOfHG-zRr0_b9yUSq8EFpKILuoEze2HepoM_8IgDlGeQ2_CCU7hUsXOBLu1V9iG2uyKLoIB49drOis2Vgtl6IWUNVeS2uRqbWqZ0EyuTuaKG0pFTF_ak345BuRIAtVydmVa2XtGSJk7DreDelGPH3Z6rgJ6lsYVin-Ec.k1A5MwaYqts04Z83WnR4STnMh3YTNaKdookQxl5yw0M&dib_tag=se&keywords=Miaowoof%2BPopsicle%2BMolds&qid=1755169866&sprefix=miaowoof%2Bpopsicle%2Bmolds%2Caps%2C236&sr=8-1-spons&sp_csd=d2lkZ2V0TmFtZT1zcF9hdGY&th=1
Hi Annabelle,
I don’t see why those silicone molds wouldn’t work, give it a try as you will still release them from the mold and dip them in melted chocolate.
Let me know how it turns out as those are a family favourite.
Kimberly
After I dip them, how would I let them keep their shape on the sticks?
Hi Annabelle,
After they’ve been in the freezer for suggested time – You just simply dip them in the melted chocolate and return them to the baking sheet and pop them back in the freezer for about 10 minutes or so and enjoy!! You can wrap them individually and keep for later too.